Sophia showed me this way of easily and quickly adding texture to an image in Photoshop! To give credit, Ben did originally show Sophia this.
- Open the image you want to add texture to in Photoshop and the texture you want to overlay (as separate files).


- On the texture image, press Select Colour Range and then select a lighter area of the texture.

- Move the fuzziness range to get the texture you want (higher is a lighter texture)

- Right click and select inverse

- Right click again and select layer via copy

- Deselect the eye (visibility) of the original texture image and you'll see the new layer of texture you've created.

- Now right click on the new texture layer in the layers panel and select duplicate layer

- The duplicate layer box will come up and you can choose to change the destination of the duplicate layer to the document you want the texture to appear on!

- Now move the texture to where you want it to be, say on the black line and where her hair is.
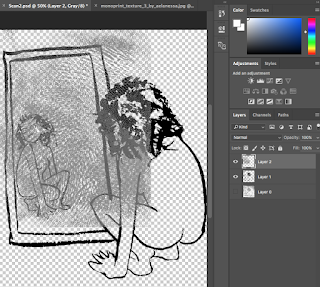

- On the layer with the image, select colour range again, but this time select where you want the texture to appear, so in this case on the black.

- Select inverse again and then on the new texture layer in the layers panel, press backspace, and the texture will appear on top of the black!

- The cheat way to change the colour is to lock the texture layer, then move the colour picker to where you want the colour, then hold alt and press backspace!

- Or you can do hue/saturation.


No comments:
Post a Comment